08Function&Accumulators&Counters
本文最后更新于 2022-08-28 11:30:56
Function&Accumulator&Counter
Function
MapFunction,FilterFunction,FlatMapFunction…….
stream.map(new MyMapFuntion)

class MyMapFuntion extends MapFunction[String,(String,Int)]{
  override def map(value: String): (String, Int) = ???
}
RichMapFunction,RichFilterFunction……..
data.map(new MyRic hMapFunction());


class MyRichMapFunction extends RichMapFunction[String, Int] {
  //map
  def map(in: String):Int = { in.toInt }

  //开始时调用
  override def open(parameters: Configuration): Unit = super.open(parameters)

  override def setRuntimeContext(t: RuntimeContext): Unit = super.setRuntimeContext(t)
  //获取context
  override def getRuntimeContext: RuntimeContext = super.getRuntimeContext

  override def getIterationRuntimeContext: IterationRuntimeContext = super.getIterationRuntimeContext

  //结束时调用
  override def close(): Unit = super.close()
};
Accumulator&Counter
总结:只需要RichFunction即可,不需要keyBy也可以。在运行时每个算子都会有一个副本,在自己算子上累加,并行度增加,算子增加,副本也就增加(和一个function里面的成员变量一样),结束后可以getAccumulatorResult获取最终累加结果
累加器是具有加法运算和最终累加结果的一种简单结构,可在作业结束后使用。
最简单的累加器就是计数器: 你可以使用 Accumulator.add(V value) 方法将其递增。在作业结束时,Flink 会汇总(合并)所有部分的结果并将其发送给客户端。 在调试过程中或在你想快速了解有关数据更多信息时,累加器作用很大。
IntCounter,LongCounter,DoubleCounter
首先,在需要使用累加器的用户自定义的转换 function 中创建一个累加器对象(此处是计数器)。
private IntCounter numLines = new IntCounter();其次,你必须在 rich function 的 open() 方法中注册累加器对象。也可以在此处定义名称。
getRuntimeContext().addAccumulator("num-lines", this.numLines);现在你可以在操作 function 中的任何位置(包括 open() 和 close() 方法中)使用累加器。
this.numLines.add(1);最终整体结果会存储在由执行环境的 execute() 方法返回的 JobExecutionResult 对象中(当前只有等待作业完成后执行才起作用)。
myJobExecutionResult.getAccumulatorResult("num-lines")单个作业的所有累加器共享一个命名空间。因此你可以在不同的操作 function 里面使用同一个累加器。Flink 会在内部将所有具有相同名称的累加器合并起来。
当前累加器的结果只有在整个作业结束后才可用
ProcessFunction&定时器
DataStream API提供了一系列的Low-Level转换算子。可以访问时间戳、watermark以及注册定时事件。还可以输出特定的一些事件,例如超时事件等。
不同的Stream下调用process()方法需要传入对应的Process Function
常用Process Function:
- ProcessFunction
- KeyedProcessFunction
- CoProcessFunction
- ProcessJoinFunction
- BroadcastProcessFunction
- KeyedBroadcastProcessFunction
- ProcessWindowFunction
- ProcessAllWindowFunction
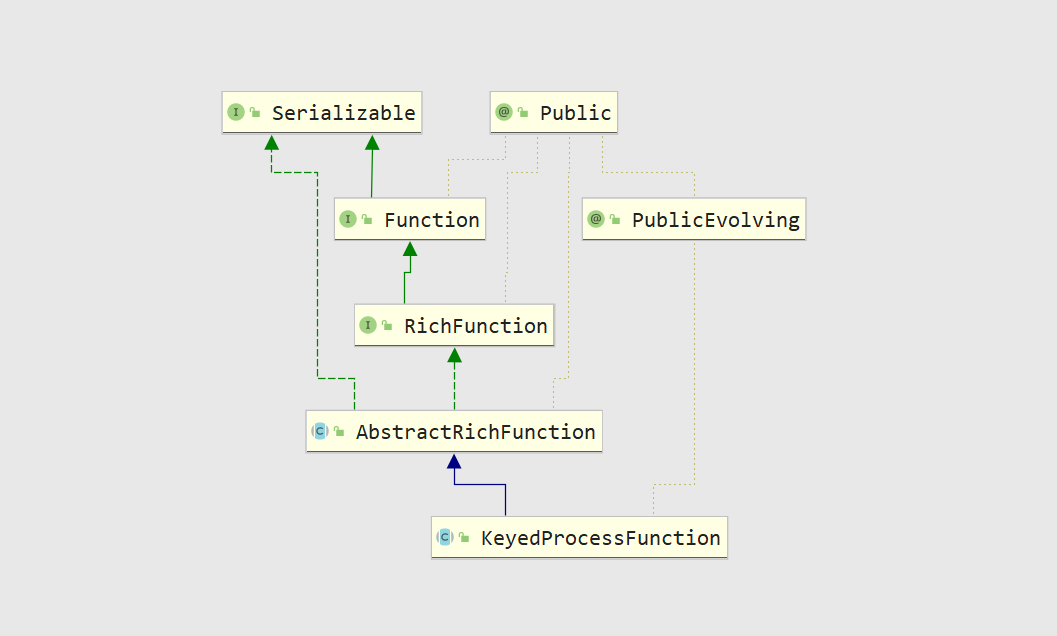
自定义KeyedProcessFunction
实现连续10秒温度上升,就输出报警
class TempIncreWarning(interval: Long) extends KeyedProcessFunction[Tuple, SensorReading, String]{
  // 由于需要跟之前的温度值做对比,所以将上一个温度保存成状态
  lazy val lastTempState: ValueState[Double] = getRuntimeContext.getState( new ValueStateDescriptor[Double]("lastTemp", classOf[Double]))
  // 为了方便删除定时器,还需要保存定时器的时间戳
  lazy val curTimerTsState: ValueState[Long] = getRuntimeContext.getState( new ValueStateDescriptor[Long]("cur-timer-ts", classOf[Long]) )

  override def processElement(value: SensorReading, ctx: KeyedProcessFunction[Tuple, SensorReading, String]#Context, out: Collector[String]): Unit = {
    // 首先取出状态
    val lastTemp = lastTempState.value()
    val curTimerTs = curTimerTsState.value()

    // 将上次温度值的状态更新为当前数据的温度值
    lastTempState.update(value.temperature)

    // 判断当前温度值,如果比之前温度高,并且没有定时器的话,注册10秒后的定时器
    if( value.temperature > lastTemp && curTimerTs == 0 ){
      val ts = ctx.timerService().currentProcessingTime() + interval
      ctx.timerService().registerProcessingTimeTimer(ts)
      curTimerTsState.update(ts)
    }
    // 如果温度下降,删除定时器
    else if( value.temperature < lastTemp ){
      ctx.timerService().deleteProcessingTimeTimer(curTimerTs)
      // 清空状态
      curTimerTsState.clear()
    }
  }

  // 定时器触发,说明10秒内没有来下降的温度值,报警
  override def onTimer(timestamp: Long, ctx: KeyedProcessFunction[Tuple, SensorReading, String]#OnTimerContext, out: Collector[String]): Unit = {
    val key = ctx.getCurrentKey.asInstanceOf[Tuple1[String]]._1
    out.collect( "温度值连续" + interval/1000 + "秒上升" )
    curTimerTsState.clear()
  }
}
// 输入数据的样例类
case class SensorReading( id: String, timestamp: Long, temperature: Double )